Dynamic Web TWAIN Linux Edition is a web-based document scanning SDK based on SANE. It consists of a native scanning service, which communicates with the scanner driver, and a JavaScript scanner library. With a few lines of JavaScript code, you can quickly build robust web scanning applications, which allow users to scan documents from Chrome and Firefox on Ubuntu, Debian, and Fedora. Furthermore, you can edit the scanned images and save them to local disk, remote server or document repository.
Dynamic Web TWAIN: A JavaScript Scanner SDK
Download
Dynamic Web TWAIN SDK, 30-day Free Trial
Features
- Access SANE-compatible scanners on Linux Ubuntu, Debian, and Fedora
- Customize scanning settings including Pixel Type, Resolution, ADF, Duplex, Contrast, and Brightness.
- Supports basic image editing features such as Rotate, Crop, Mirror, Flip, Erase, and Change Image Size.
- Supports saving scanned documents as PDF or images to local disk, remote server or database.
- Easily integrate the SANE JavaScript APIs with any Web application such as ASP.NET, PHP, JSP and etc.
- Create a cross-browser cross-platform web scanning solution along with the TWAIN scanning modules of Dynamic Web TWAIN for Windows and macOS.
Sample Code
To learn relevant sample code, you can either visit Dynamic Web TWAIN code gallery or Dynamsoft GitHub repositories.
Developer Center
Tutorial, API reference and more.
Online Demo
https://www.dynamsoft.com/Demo/DWT/online_demo_scan.aspx
Image may be NSFW.
Clik here to view.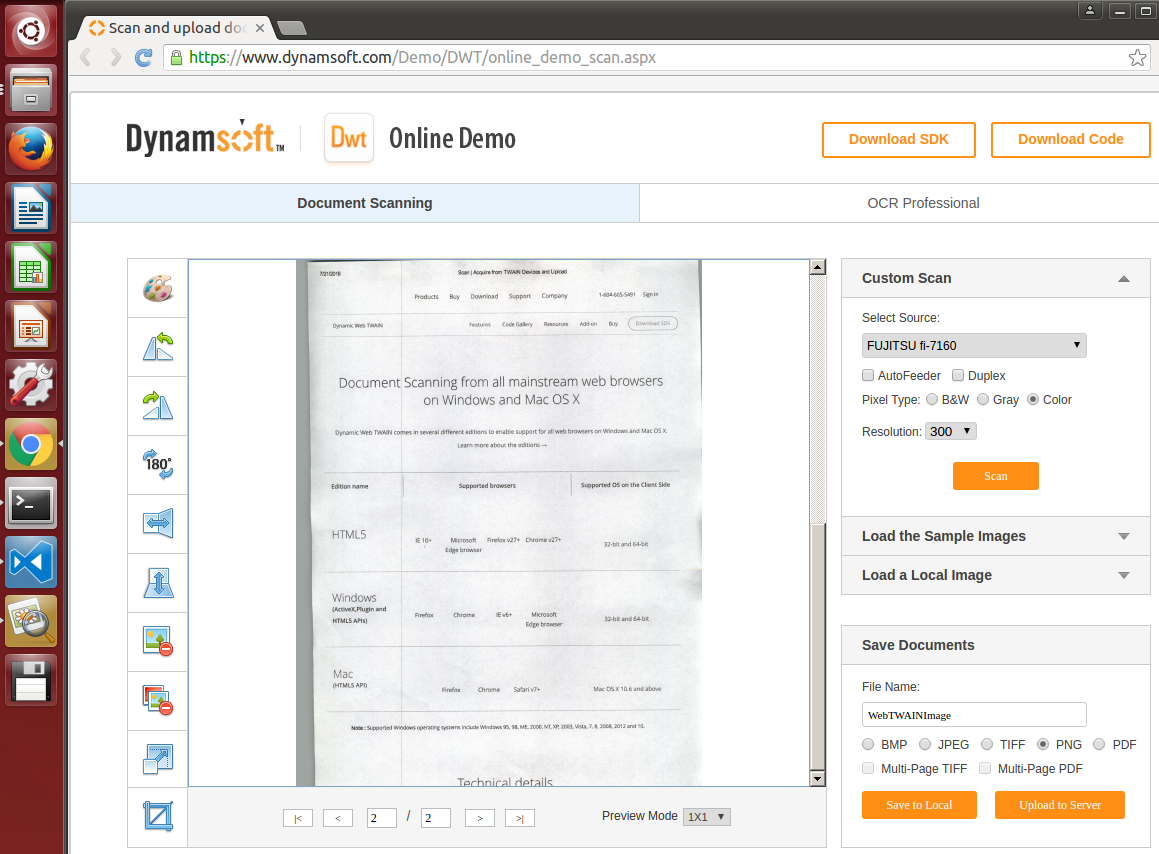
Your First Web Document Scanning App for Linux
Install Dynamic Web TWAIN scanning service
Scanning service, which is pre-built for different operating systems, communicates with scanner drivers. Comparing to other JavaScript scanner SDK, Dynamic Web TWAIN is the real cross-platform solution, because it does not only support Windows but also macOS and Linux.
Image may be NSFW.
Clik here to view.
When experiencing the online demo from different platforms, users need to firstly install a corresponding scanning service package – exe file for Windows, deb file for Linux and pkg file for macOS – in order to make web app works.
If you have downloaded Dynamic Web TWAIN, you can find all package files under <Your Dynamic Web TWAIN Path>/Resources. Let’s try to write a simple web document scanning and uploading app from scratch.
Getting Started: Hello World
Scan Documents
If you just want to scan documents in web browsers, you do not need to use any server-side programming languages but HTML and JavaScript.
Create index.html and copy Resources folder to your project.
Include dynamsoft.webtwain.initiate.js and dynamsoft.webtwain.config.js in sequence:
<head>
    <title>Use Dynamic Web TWAIN to Upload</title>
    <script type="text/javascript" src="Resources/dynamsoft.webtwain.initiate.js"></script>
    <script type="text/javascript" src="Resources/dynamsoft.webtwain.config.js"></script>
</head>
Create a container, which will be used for Dynamic Web TWAIN initialization:
<div id="dwtcontrolContainer"></div>
Register the onReady event. Once you get the DWObject, you can list all scanner sources:
Dynamsoft.WebTwainEnv.RegisterEvent('OnWebTwainReady', Dynamsoft_OnReady); // Register OnWebTwainReady event. This event fires as soon as Dynamic Web TWAIN is initialized and ready to be used

        var DWObject;

        function Dynamsoft_OnReady() {
            DWObject = Dynamsoft.WebTwainEnv.GetWebTwain('dwtcontrolContainer'); // Get the Dynamic Web TWAIN object that is embeded in the div with id 'dwtcontrolContainer'
            if (DWObject) {
                var count = DWObject.SourceCount; // Populate how many sources are installed in the system
				if(count == 0 && Dynamsoft.Lib.env.bMac)
				{
					DWObject.CloseSourceManager();
					DWObject.ImageCaptureDriverType = 0;
					DWObject.OpenSourceManager();
					count = DWObject.SourceCount;
				}

                for (var i = 0; i < count; i++)
                    document.getElementById("source").options.add(new Option(DWObject.GetSourceNameItems(i), i));  // Add the sources in a drop-down list
                document.getElementById("imgTypejpeg").checked = true;
            }
        }
Create a button click event for scanning documents:
function AcquireImage() {
            if (DWObject) {
				var OnAcquireImageSuccess, OnAcquireImageFailure;
				OnAcquireImageSuccess = OnAcquireImageFailure = function (){
					DWObject.CloseSource();
				};

                DWObject.SelectSourceByIndex(document.getElementById("source").selectedIndex);
                DWObject.OpenSource();
                DWObject.IfDisableSourceAfterAcquire = true;	// Scanner source will be disabled/closed automatically after the scan.
                DWObject.AcquireImage(OnAcquireImageSuccess, OnAcquireImageFailure);
            }
        }

        //Callback functions for async APIs
        function OnSuccess() {
            console.log('successful');
        }

        function OnFailure(errorCode, errorString) {
            alert(errorString);
        }
You can now double-click index.html to scan documents.
Upload Documents
To upload files, you need to use server-side programming languages such as JSP, PHP, Python, C#, and Node.js. The following code is written in ASP.NET Core.
What is .NET Core? “.NET Core is a blazing fast, lightweight and modular platform for creating web applications and services that run on Windows, Linux and Mac” by Microsoft. Using Visual Studio Code, it will be efficient to write and debug code of ASP.NET Core web project.
Add button click function UploadImage() to index.html:
function UploadImage() {
            if (DWObject) {
                // If no image in buffer, return the function
                if (DWObject.HowManyImagesInBuffer == 0)
                    return;

                var strHTTPServer = location.hostname; //The name of the HTTP server. For example: "www.dynamsoft.com";
                var CurrentPathName = unescape(location.pathname);
                var CurrentPath = CurrentPathName.substring(0, CurrentPathName.lastIndexOf("/") + 1);
                var strActionPage = CurrentPath + "upload";
                DWObject.IfSSL = false; // Set whether SSL is used
                DWObject.HTTPPort = location.port == "" ? 80 : location.port;

                var Digital = new Date();
                var uploadfilename = Digital.getMilliseconds(); // Uses milliseconds according to local time as the file name

                // Upload the image(s) to the server asynchronously
                if (document.getElementById("imgTypejpeg").checked == true) {
                    //If the current image is B&W
                    //1 is B&W, 8 is Gray, 24 is RGB
                    if (DWObject.GetImageBitDepth(DWObject.CurrentImageIndexInBuffer) == 1)
                        //If so, convert the image to Gray
                        DWObject.ConvertToGrayScale(DWObject.CurrentImageIndexInBuffer);
                    //Upload image in JPEG
                    DWObject.HTTPUploadThroughPost(strHTTPServer, DWObject.CurrentImageIndexInBuffer, strActionPage, uploadfilename + ".jpg", OnHttpUploadSuccess, OnHttpUploadFailure);
                }
                else if (document.getElementById("imgTypetiff").checked == true) {
                    DWObject.HTTPUploadAllThroughPostAsMultiPageTIFF(strHTTPServer, strActionPage, uploadfilename + ".tif", OnHttpUploadSuccess, OnHttpUploadFailure);
                }
                else if (document.getElementById("imgTypepdf").checked == true) {
                    DWObject.HTTPUploadAllThroughPostAsPDF(strHTTPServer, strActionPage, uploadfilename + ".pdf", OnHttpUploadSuccess, OnHttpUploadFailure);
                }
            }
        }
Create a new .NET Core project via command line tool:
dotnet new
Create the default static resource folder wwwroot. Copy index.html and Resources to this folder.
Open project.json to add dependencies:
"Microsoft.AspNetCore.Server.Kestrel": "1.0.1",
"Microsoft.AspNetCore.StaticFiles": "1.0.0"
Kestrel is a web server.
Change Program.cs to run as a web server:
public static void Main(string[] args)
        {
            var host = new WebHostBuilder()
                .UseKestrel()
                .UseContentRoot(Directory.GetCurrentDirectory())
                .UseStartup<Startup>()
                .Build();

            host.Run();
        }
Create Startup.cs to load static resources and save uploaded files:
using System.IO;
using Microsoft.AspNetCore.Builder;
using Microsoft.AspNetCore.Hosting;

namespace aspnetcoreapp
{
    public class Startup
    {
        public void Configure(IApplicationBuilder app)
        {
            app.UseFileServer(); // load static resource files

            app.Map("/upload", UploadFile); // save uploaded files
        }

        private static void UploadFile(IApplicationBuilder app)
        {
            app.Run(async context =>
            {
                var files = context.Request.Form.Files;
                var uploads = Path.Combine(Directory.GetCurrentDirectory(), "uploads");
                if (!Directory.Exists(uploads)) {
                    Directory.CreateDirectory(uploads);
                }

                foreach (var file in files)
                {
                    var filename = file.FileName;
                    using (var fileStream = new FileStream(Path.Combine(uploads, filename), FileMode.Create))
                    {
                        await file.CopyToAsync(fileStream);
                    }
                }
            });
        }
    }
}
Run the web application:
dotnet restore
dotnet run
Visit localhost:5000 to test this web scanning app on Ubuntu:
Image may be NSFW.
Clik here to view.
Source Code
https://github.com/dynamsoft-dwt/ASP.NET-Core
Document Scanning SDK for Raspberry Pi
In addition to the released Linux (x64) edition, there is a Raspberry Pi (ARM) edition built for the experiment. The Dynamic Web TWAIN leverages WebSocket technology to transfer data between scanning service and JavaScript library. Therefore, no matter where the service deployed on, you just need to modify the IP address that used for WebSocket communication.
Scanner Sidecar Solution
Look at the following figure to understand how Dynamic Web TWAIN works with Raspberry Pi.
Image may be NSFW.
Clik here to view.
What are the benefits of using this solution?
- No connection needed between a scanner and a PC.
- No plugin needed on web client-side.
Visit Dynamsoft Labs to get more information.
How to Remotely Control Scanner with Raspberry Pi?
Download Dynamic Web TWAIN for Pi.
Install scanning service on Raspberry Pi:
sudo dpkg -i dynamic_web_twain-arm-trial.deb
Uninstall:
sudo dpkg -r dynamsoft-webtwain-service
Initialize DWObject with Raspberry Pi IP address:
var DWObject;
		var remoteIP = "192.168.8.51";
		Dynamsoft.WebTwainEnv.AutoLoad = false;
		// The product key is for trial. Please contact support@dynamsoft for purchase.
		Dynamsoft.WebTwainEnv.ProductKey = '4EC19D9E43E8CF8D7B1DF91DD6611FFA7F171B700694370EBD051E15068214152A5EAADAD65B6792DF529A388CCD09CBBBB4984FA356DDB4EEF8233CB50749BD9114C154F129FE6F65F71C6D264D5B3611B1500039F8BD71CEEA60DB407375B9A5A570D8B1B8C14F43A343650F64399E3F6AD7E6415A4DF8EAAB7C8B4D409F98033E970A1637';
		var HTTP_PORT = 18618;
		var HTTPS_PORT = 18619;
		window.onload = function() {
			Dynamsoft.WebTwainEnv.CreateDWTObject('dwtObjectContainer', remoteIP, HTTP_PORT, HTTPS_PORT, function(obj) {
				DWObject = obj;
				DWObject.Width = 270;
				DWObject.Height = 350;
				console.log('DWTObject created.');
				if (DWObject) {
					var count = DWObject.SourceCount;
					if (count == 0 && Dynamsoft.Lib.env.bMac) {
						DWObject.CloseSourceManager();
						DWObject.ImageCaptureDriverType = 0;
						DWObject.OpenSourceManager();
						count = DWObject.SourceCount;
					}
					for (var i = 0; i < count; i++)
						document.getElementById("source").options.add(new Option(DWObject.GetSourceNameItems(i), i)); // Get Data Source names from Data Source Manager and put them in a drop-down box
				}
			}, function(es) {
				console.log(es);
			});
		};
Open index.html in any HTML5 supported web browsers from PC, tablet, smartphone or laptop to scan documents with no plugin.
Demo Video
Source Code
https://github.com/dynamsoftlabs/raspberrypi-document-scanning
The post JavaScript Scanner SDK for Ubuntu and Raspberry Pi appeared first on Code Pool.